- Architecture Diagram of AWS Batch
- Step 1: Manually Connect Your GitHub Repository
- Step 2: Create Your ECR Repository
- Step 3: Create an S3 Bucket for Artifacts
- Step 4: Walkthrough of CloudFormation Code for CodePipeline
- Step 5: Walkthrough of AWS Batch Job Task
- Step 6: AWS Batch Fargate vs Normal AWS Fargate Tasks
- Conclusion
Embarking on your journey to create a scalable and automated workload on AWS can be incredibly exciting. In this blog, I’ll walk you through how to deploy your first AWS Batch job using AWS CodePipeline built entirely with CloudFormation templates. We’ll cover everything from setting up GitHub connections and Docker containers to configuring the pipeline, using a step-by-step approach that will help you bring automation to your cloud infrastructure. Let’s dive in!
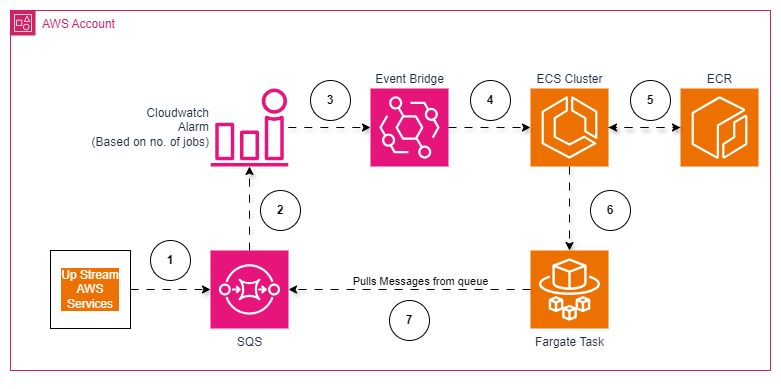
Architecture Diagram of AWS Batch
Before we get into the specifics of deploying your AWS Batch, it’s helpful to understand what the architecture looks like.
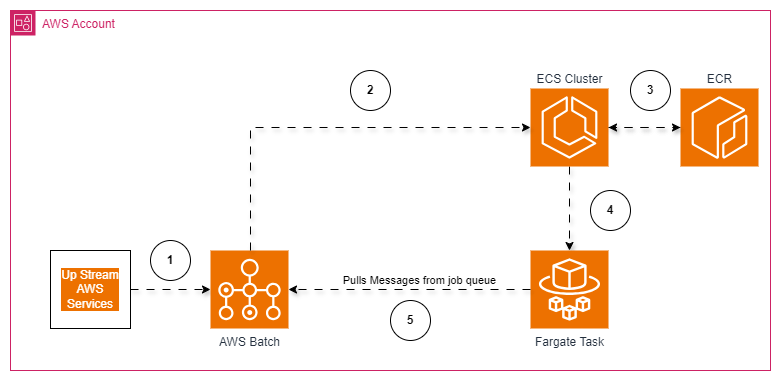
The diagram above showcases how AWS Batch integrates with AWS CodePipeline, GitHub, ECR, and other services to manage a scalable and highly available job processing environment.
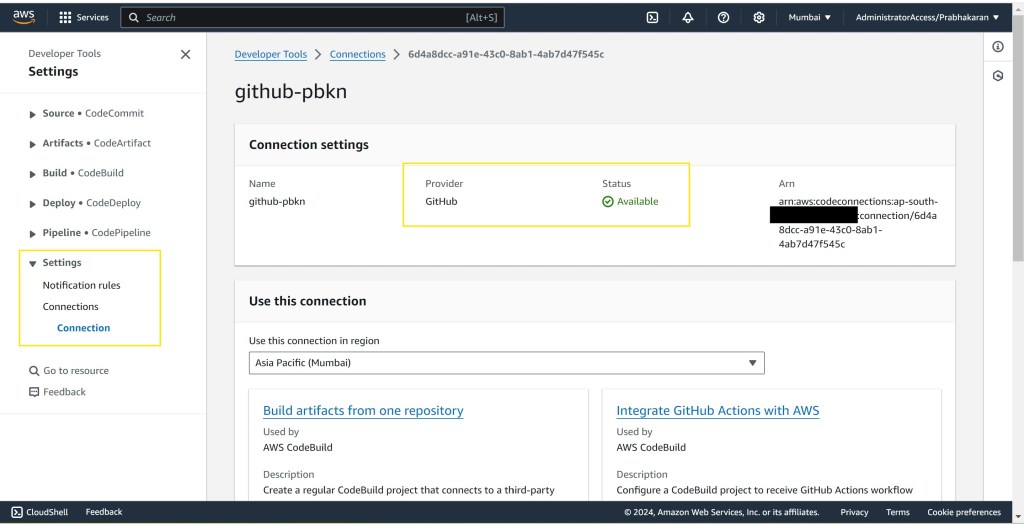
Step 1: Manually Connect Your GitHub Repository
The first step in creating your CodePipeline is setting up a GitHub connection. This will allow AWS CodePipeline to pull source code directly from your repository, triggering builds and deployments automatically.
- Go to the AWS CodePipeline console and navigate to Connections.
- Create a new connection, then authorize GitHub with your GitHub username.
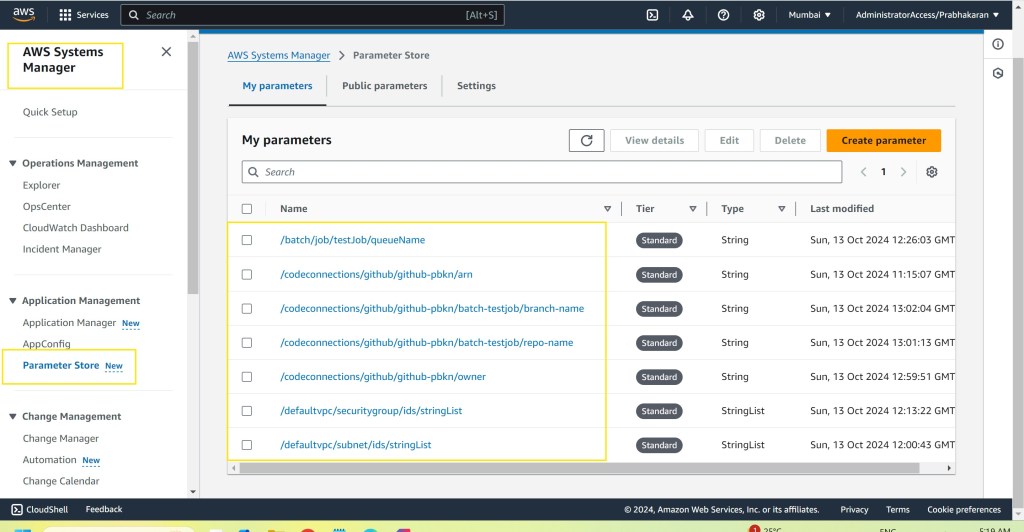
- Once authorized, make note of the connection ARN, repository name, and branch name, and store these values in SSM Parameter Store.
Storing these as parameters in AWS Systems Manager (SSM) makes your setup dynamic and easy to manage, allowing updates directly in SSM without changing the CloudFormation template.
Step 2: Create Your ECR Repository
AWS Batch uses container images, so you need to create an Amazon Elastic Container Registry (ECR) repository to store the Docker images for your batch job.
- Navigate to Amazon ECR in the AWS Management Console.
- Create a new repository named “batch-jobs/test-job” to hold the Docker image for your Java-based AWS Batch job.
This repository will be referenced in your Dockerfile to ensure that your batch jobs can pull the latest image each time.

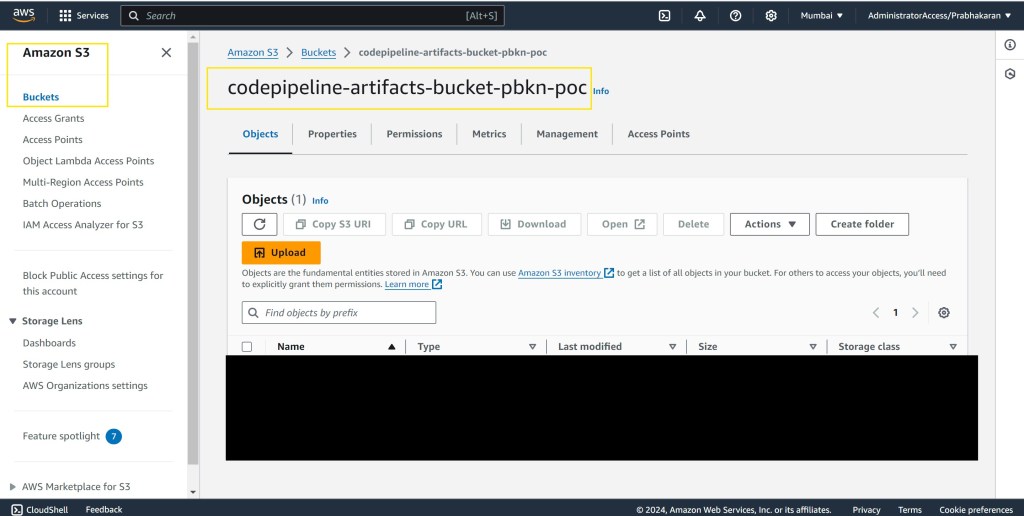
Step 3: Create an S3 Bucket for Artifacts
To set up AWS CodePipeline, you will need an S3 bucket for storing artifacts during each stage of your build and deployment process.
- Go to the S3 console and create an S3 bucket named something like “codepipeline-artifacts-bucket-pbkn-poc”.
- This bucket name should be referenced as a parameter in your CloudFormation template, ensuring the template remains flexible.
Step 4: Walkthrough of CloudFormation Code for CodePipeline
Next up is the AWS CloudFormation template that creates the CodePipeline, handling every stage from sourcing to deployment. Here’s an overview of the core components:
- Source Stage: Connects to GitHub to pull the latest code. The connection details are dynamically referenced from SSM.
- Build Stage: Uses AWS CodeBuild to create a Docker image from the code and push it to ECR.
- Deploy Stage: Uses AWS CloudFormation to create the AWS Batch job definition and other resources.
The full template can be found in the GitHub repository linked below for detailed reference: https://github.com/pbkn/codepipeline-cloudformation-template
Step 5: Walkthrough of AWS Batch Job Task
The AWS Batch job itself is defined in a separate template.yml file, which includes key components such as job definition, compute environment, and job queue. Here are the main components:
- Java Code: The logic is implemented in the
HelloBatch.javaclass that lists jobs in the queue and logs their details. - Maven Configuration (pom.xml): This includes dependencies like AWS SDK, Log4j, and Maven Shade Plugin to bundle everything into a runnable JAR.
- Dockerfile: Used to create the Docker image based on the Amazon Corretto base image, with all dependencies included.
- Buildspec.yml: The file used by CodeBuild to define how to build the Docker image and push it to ECR.
The full template can be found in the GitHub repository linked below for detailed reference: https://github.com/pbkn/aws-batch-task
Step 6: AWS Batch Fargate vs Normal AWS Fargate Tasks
A common question arises when deploying AWS Batch: How does it differ from running a normal AWS Fargate task? Here’s a detailed comparison:
| Feature/Aspect | AWS Batch Fargate | Normal AWS Fargate Task |
|---|---|---|
| Job Scheduling | Fully managed, automatic job orchestration | Requires manual scheduling (e.g., EventBridge) |
| Scalability | Auto-scales resources for batch workloads | Manual setup for scaling using ECS services |
| Best for | High-throughput batch processing | Stateless microservices and APIs |
Architecture Diagram: Normal AWS Fargate
Conclusion
Deploying AWS Batch using AWS CodePipeline through CloudFormation can streamline your workflow, bringing automation to every stage—from source control to deployment. By leveraging tools like SSM Parameter Store and CodeBuild, you can create an incredibly flexible system that scales with your workload requirements. AWS Batch, in particular, shines for managing large-scale, complex workflows, with full support for dependency management and auto-scaling of resources.
Be sure to check out the GitHub repository linked throughout this post for all the code, configurations, and CloudFormation templates that power this setup. Happy building!

Leave a comment